Chatwoot: Self-Hosted Customer Support That Replaces Intercom

Chatwoot: Self-Hosted Customer Support That Replaces Intercom
The Problem: Customer Support Tools Are Bleeding Your Budget
Your Intercom bill just hit $799/month, and you're not even at full capacity yet. Every new support agent adds $50-100/month, every additional feature tier costs more, and you're paying for thousands of contacts you barely message. Meanwhile, your customer data lives on someone else's servers, subject to their terms, their price increases, and their privacy policies. You're locked into a platform that's optimizing for their revenue, not your ROI.
Chatwoot changes that equation. It's an open-source, self-hosted customer support platform that gives you everything Intercom offers—live chat, inbox management, automation, integrations—without the recurring fees or data lock-in.
What You'll Build
A complete, production-ready customer support platform featuring:
- Live chat widget for your website
- Unified inbox for email, chat, social media, and WhatsApp
- Team collaboration with assignment rules and canned responses
- Automation using custom bots and workflows
- Reporting & analytics for support performance
- Multi-brand support for managing multiple products
- All self-hosted with full data control
Time to implement: 20-30 minutes Technical level: Intermediate Cost savings: $500-2000/month vs. Intercom/Zendesk
Why Self-Host Chatwoot?
Cost Comparison:
| Platform | 3 Agents | 10 Agents | 25 Agents |
|---|---|---|---|
| Intercom | $799/mo | $2,500/mo | $5,000/mo+ |
| Zendesk | $690/mo | $2,300/mo | $5,750/mo |
| Chatwoot (Elestio) | $10-50/mo | $10-50/mo | $10-50/mo |
Beyond Cost:
- ✅ Full data ownership - Customer conversations stay on your infrastructure
- ✅ Compliance ready - GDPR, HIPAA, SOC2 - you control the data
- ✅ No contact limits - Support unlimited customers without tier upgrades
- ✅ Unlimited agents - Scale your team without per-seat fees
- ✅ Custom integrations - Full API access, no vendor limitations
- ✅ No vendor lock-in - Export your data anytime, migrate freely
Prerequisites
Before you begin, ensure you have:
- Elestio account (Sign up here)
- Domain name for Chatwoot (e.g., support.yourcompany.com)
- Email service for transactional emails (SMTP/SendGrid/Mailgun)
- Basic understanding of DNS configuration
- Optional: Social media credentials (Facebook, Twitter, WhatsApp Business API)
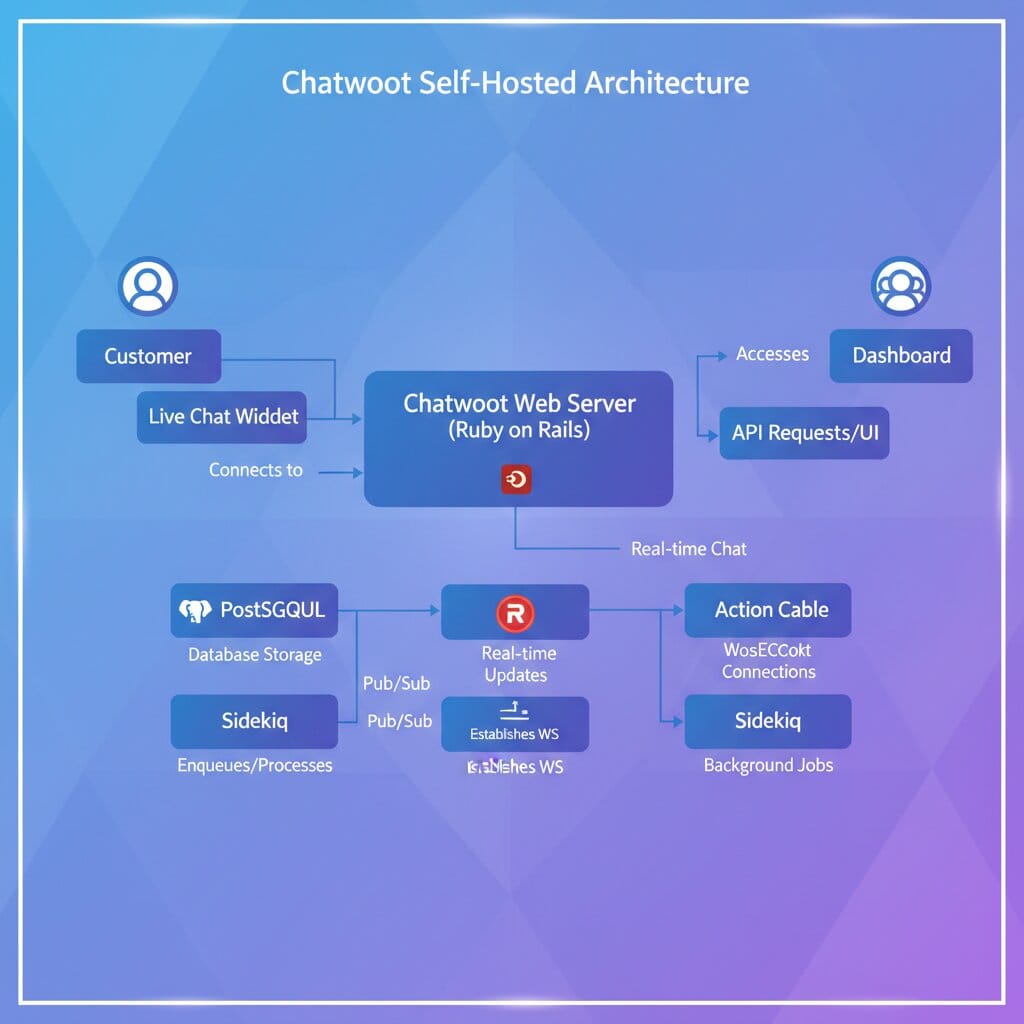
Architecture Overview
Chatwoot's architecture consists of:
Customer → Live Chat Widget → Chatwoot Web Server → PostgreSQL Database
                ↓
Support Team ← Chatwoot Dashboard ← Real-time Updates (Action Cable)
                ↓
Email/Social Media ← Integrations → External Services
Components:
- Web Server: Rails application serving the dashboard and chat widget
- PostgreSQL: Stores conversations, contacts, and configuration
- Redis: Handles real-time updates and background jobs
- Action Cable: WebSocket server for live updates
- Sidekiq: Background job processing for emails and integrations
Step-by-Step Deployment on Elestio
Step 1: Deploy Chatwoot Instance
On Elestio Dashboard:
- Navigate to Elestio Services
- Search for "Chatwoot"
- Click "Deploy"
- Configure your instance:
Basic Configuration:
Service Name: chatwoot-production
Provider: Choose from Netcup, Hetzner, DigitalOcean, Linode, Vultr, ScaleWay, BYO AWS, or BYO VM
Region: Closest to your customers
Plan: 2 CPU / 4 GB RAM minimum (required for optimal performance)
- Click "Deploy Service"
- Wait 3-5 minutes for deployment to complete
Elestio will automatically:
- Provision the server
- Install Chatwoot with PostgreSQL and Redis
- Configure SSL certificates
- Set up automatic backups
- Provide admin credentials
Step 2: Initial Admin Setup
Once deployment completes, Elestio provides your admin credentials.
Access your Chatwoot instance:
- Navigate to
https://support.yourcompany.com - Log in with provided admin credentials
- First-time setup wizard:
Account Name: Your Company Support
Your Name: [Your Name]
Email: admin@yourcompany.com
Password: [Create strong password]
- Create your first inbox:
- Inbox Type: Website
- Name: "Main Website Chat"
- Domain: yourcompany.com
Step 3: Install Chat Widget on Your Website
After creating your inbox, Chatwoot generates a unique widget script for your installation.
Important: Do NOT use placeholder code. Instead:
- In your Chatwoot dashboard, go to Settings → Inboxes
- Select your inbox (e.g., "Main Website Chat")
- Click on the "Settings" tab
- Scroll to "Configuration" section
- Copy the provided widget code from your Chatwoot instance
The code will look like this (with YOUR specific token and domain):
<script>
(function(d,t) {
  var BASE_URL="https://YOUR-CHATWOOT-DOMAIN.com";
  var g=d.createElement(t),s=d.getElementsByTagName(t)[0];
  g.src=BASE_URL+"/packs/js/sdk.js";
  g.defer = true;
  g.async = true;
  s.parentNode.insertBefore(g,s);
  g.onload=function(){
    window.chatwootSDK.run({
      websiteToken: 'YOUR_ACTUAL_GENERATED_TOKEN',
      baseUrl: BASE_URL
    })
  }
})(document,"script");
</script>
✅ Always copy the code from your own Chatwoot Settings page - it contains your unique website token and domain.
Add to your website:
Place this script just before the closing </body> tag on every page where you want live chat.
For React/Next.js apps:
// components/ChatwootWidget.js
import { useEffect } from 'react';

export default function ChatwootWidget() {
  useEffect(() => {
    // Add Chatwoot Settings
    window.chatwootSettings = {
      hideMessageBubble: false,
      position: 'right',
      locale: 'en',
      type: 'standard',
    };

    // Load Chatwoot SDK
    (function(d,t) {
      var BASE_URL = "https://support.yourcompany.com";
      var g = d.createElement(t),
          s = d.getElementsByTagName(t)[0];
      g.src = BASE_URL + "/packs/js/sdk.js";
      g.defer = true;
      g.async = true;
      s.parentNode.insertBefore(g,s);
      g.onload = function(){
        window.chatwootSDK.run({
          websiteToken: 'YOUR_WEBSITE_TOKEN',
          baseUrl: BASE_URL
        });
      };
    })(document,"script");
  }, []);

  return null;
}
Then import in your main layout:
import ChatwootWidget from '@/components/ChatwootWidget';

export default function Layout({ children }) {
  return (
    <>
      {children}
      <ChatwootWidget />
    </>
  );
}
Step 4: Configure Email Inbox
To receive customer emails in Chatwoot:
- Go to Settings → Inboxes
- Click "Add Inbox"
- Select "Email"
- Configure:
Inbox Name: Support Email
Email Address: support@yourcompany.com
IMAP Settings:
  - Server: imap.gmail.com (or your provider)
  - Port: 993
  - Username: support@yourcompany.com
  - Password: [Your email password or app-specific password]
  - Enable SSL: Yes
For Gmail:
- Enable IMAP in Gmail settings
- Use an App-Specific Password (not your main password)
- Allow less secure apps OR use OAuth2
Step 5: Set Up Team & Agents
Add team members:
- Go to Settings → Agents
- Click "Add Agent"
- Fill in details:
Agent Name: Jane Smith
Email: jane@yourcompany.com
Role: Agent (or Administrator)
Create teams for organization:
- Go to Settings → Teams
- Click "Create Team"
- Configure:
Team Name: Technical Support
Description: Handles technical inquiries
Members: [Select agents]
Auto-assign conversations: Yes
Set up assignment rules:
// Settings → Automation → Assignment Rules
Rule Name: Route technical questions to tech team
Conditions:
  - Message contains: "bug", "error", "technical", "API"
Actions:
  - Assign to team: Technical Support
  - Add label: technical
Step 6: Configure Canned Responses
Create reusable message templates:
- Go to Settings → Canned Responses
- Click "Add Canned Response"
- Example templates:
Short Code: /greeting
Content:
Hi there! 👋 Thanks for reaching out to {company_name}.
How can I help you today?
Short Code: /shipping
Content:
Our standard shipping takes 3-5 business days.
You can track your order here: {order_tracking_link}
Is there anything else I can help with?
Short Code: /escalate
Content:
I'm escalating your issue to our senior team.
You'll hear back within 4 hours.
Reference: #{conversation_id}
Use in conversations: Type / to trigger autocomplete.
Step 7: Set Up Automation
Create automated workflows:
- Go to Settings → Automation
- Click "Add Automation Rule"
Example: Auto-reply during off-hours:
Automation Name: After Hours Response
Event: Conversation Created
Conditions:
  - Inbox: Main Website Chat
  - Time: Between 6 PM and 9 AM
Actions:
  - Send Message: "Thanks for contacting us! Our team is offline right now but will respond within 1 business hour when we're back. Typical hours: 9 AM - 6 PM EST."
  - Add Label: after-hours
Example: Tag high-value customers:
Automation Name: VIP Customer Tag
Event: Conversation Created
Conditions:
  - Contact custom attribute: plan = "enterprise"
Actions:
  - Add Label: vip
  - Assign to team: Account Management
  - Send notification to: managers@yourcompany.com
Step 8: Integrate with External Services
Connect Slack for notifications:
- Go to Settings → Integrations
- Find Slack → Click "Connect"
- Authorize Chatwoot in your Slack workspace
- Configure channel:
New Conversation Notifications: #support-team
Assigned Conversation: #support-team
Resolved Conversation: Don't notify
Webhook integration for custom workflows:
// Settings → Integrations → Webhooks
Webhook URL: https://your-api.com/chatwoot-webhook
Events to subscribe:
  - conversation_created
  - conversation_resolved
  - message_created

// Example webhook payload received:
{
  "event": "message_created",
  "id": "123",
  "content": "Customer message here",
  "conversation_id": 456,
  "sender": {
    "email": "customer@example.com",
    "name": "John Doe"
  }
}

// Your API can then:
// - Log to analytics
// - Trigger N8N workflows
// - Update CRM (Salesforce, HubSpot)
// - Send to ticketing system
Connect WhatsApp Business:
- Set up WhatsApp Business API account
- Get API credentials from Facebook Business
- In Chatwoot: Settings → Inboxes → Add Inbox → WhatsApp
- Enter credentials:
Phone Number ID: [From Facebook]
WhatsApp Business Account ID: [From Facebook]
API Key: [From Facebook]
Troubleshooting
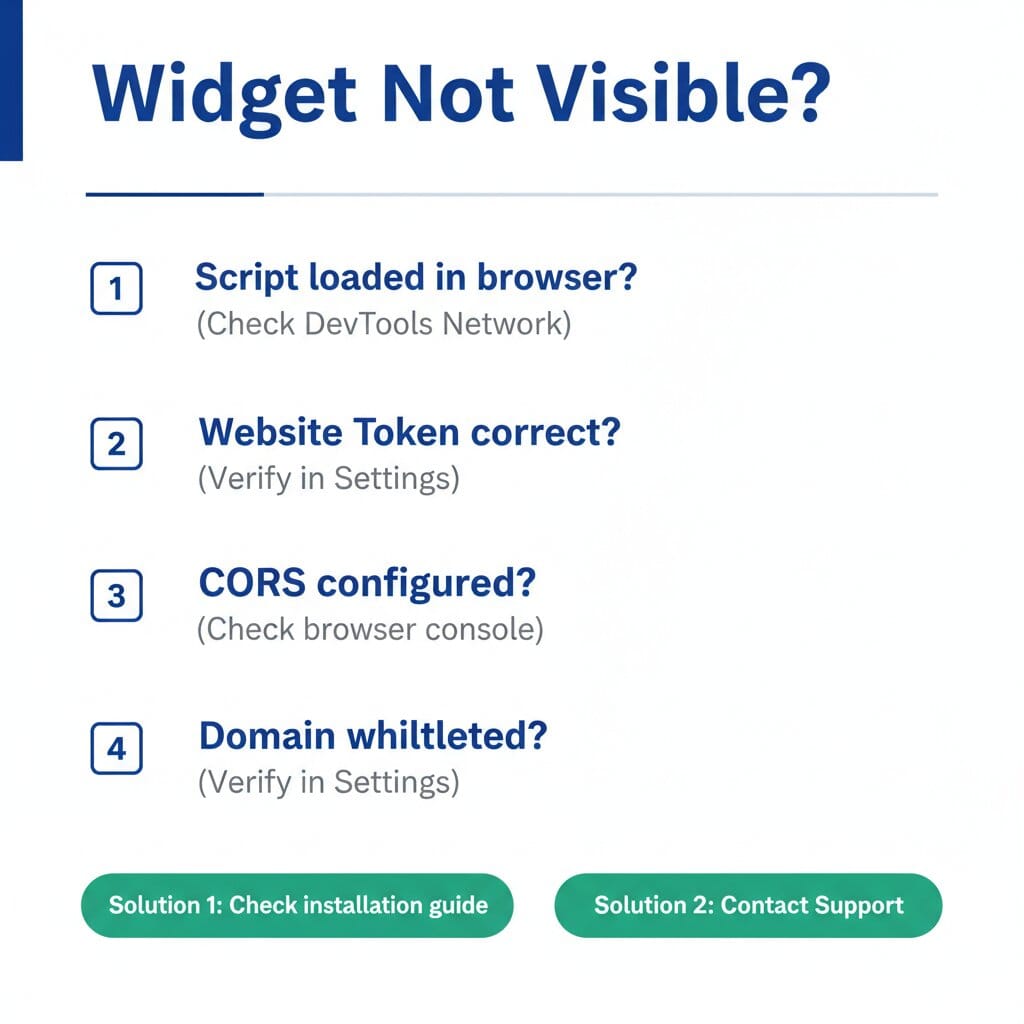
Issue: Chat Widget Not Appearing on Website
Symptoms: Widget script installed but no chat bubble visible
Solutions:
- ✅ Verify
websiteTokenmatches exactly from Chatwoot dashboard - ✅ Check browser console for JavaScript errors
- ✅ Ensure script is loaded (check Network tab in DevTools)
- ✅ Try incognito mode to rule out browser extensions blocking it
- ✅ Verify domain whitelisting in Chatwoot: Settings → Inboxes → [Your Inbox] → Configuration → Allowed Domains
- ✅ Check CSP headers aren't blocking Chatwoot domain
Issue: Emails Not Being Received in Chatwoot
Symptoms: Customers send emails to support@ but they don't appear in inbox
Solutions:
- ✅ Verify IMAP credentials are correct
- ✅ Check IMAP port (993 for SSL, 143 for non-SSL)
- ✅ Enable IMAP in email provider settings
- ✅ For Gmail: Create App-Specific Password
- ✅ Check Chatwoot logs: Settings → System → Logs
- ✅ Test IMAP connection:
openssl s_client -connect imap.gmail.com:993 - ✅ Verify firewall allows outbound connection to IMAP server
Issue: Real-Time Updates Not Working
Symptoms: Agents don't see new messages without refreshing
Solutions:
- ✅ Verify Action Cable (WebSocket) is running: Check
wss://connection in browser DevTools - ✅ Ensure reverse proxy supports WebSocket (Nginx/Apache config)
- ✅ Check Redis is running:
redis-cli pingshould returnPONG - ✅ Verify
FRONTEND_URLenvironment variable is correct - ✅ Check browser console for WebSocket connection errors
Issue: High Memory Usage
Symptoms: Chatwoot consuming excessive RAM, slow performance
Solutions:
- ✅ Scale up to at least 4GB RAM for production workloads
- ✅ Optimize Sidekiq workers: Reduce concurrency in
config/sidekiq.yml - ✅ Enable Redis persistence: Check
redis.confsettings - ✅ Monitor with
htopordocker statsto identify bottlenecks - ✅ Archive old conversations: Settings → Data Retention
- ✅ Upgrade to larger Elestio plan if needed
Issue: Notifications Not Sending
Symptoms: Agents not receiving email/Slack notifications for new conversations
Solutions:
- ✅ Verify SMTP configuration is correct
- ✅ Test email delivery: Send test email from Chatwoot
- ✅ Check agent notification preferences: Profile → Notifications
- ✅ Verify Slack integration is connected and authorized
- ✅ Check Sidekiq is processing jobs: Settings → System → Sidekiq
- ✅ Review email logs for delivery failures
Production Best Practices
Performance Optimization
Database Indexing:
-- Connect to PostgreSQL
docker exec -it chatwoot_postgres psql -U chatwoot

-- Add indexes for common queries
CREATE INDEX idx_conversations_account_status ON conversations(account_id, status);
CREATE INDEX idx_messages_conversation_created ON messages(conversation_id, created_at);
CREATE INDEX idx_contacts_email ON contacts(email);
Caching Strategy:
- Enable Redis caching for frequently accessed data
- Set appropriate TTL values (Time To Live)
- Monitor cache hit rates
Background Jobs:
- Monitor Sidekiq queue lengths
- Scale workers based on load
- Set up dead letter queue monitoring
Security Hardening
Enable two-factor authentication:
- Go to Settings → Profile → Two-Factor Authentication
- Scan QR code with authenticator app
- Save backup codes securely
API security:
# Restrict API access by IP (in nginx/reverse proxy)
location /api {
    allow 203.0.113.0/24;  # Your office IP range
    deny all;
    proxy_pass http://chatwoot;
}
Regular backups:
# Automated database backups (Elestio handles this, but verify)
# Settings → Backups → Schedule: Daily at 2 AM UTC
# Retention: 30 days
Monitoring & Alerts
Set up uptime monitoring:
- Use UptimeRobot or Pingdom to monitor
https://support.yourcompany.com - Alert on downtime > 2 minutes
- Monitor SSL certificate expiration
Application metrics:
- Track average response time
- Monitor conversation resolution rate
- Measure CSAT (Customer Satisfaction) scores
Resource monitoring:
# Set up alerts for:
# - CPU usage > 80% for 5 minutes
# - Memory usage > 90%
# - Disk usage > 85%
# - Database connections > 80% of max
Scaling Considerations
Horizontal Scaling: When you outgrow single-server setup:
- Deploy multiple Chatwoot web servers behind load balancer
- Use external PostgreSQL (managed database)
- Scale Redis with Redis Cluster or Sentinel
- Separate Sidekiq workers onto dedicated instances
Vertical Scaling (Easier First Step):
- Upgrade to 4GB → 8GB → 16GB RAM plans on Elestio
- Monitor resource usage to predict when scaling is needed
Migrating from Intercom/Zendesk
Export your data:
From Intercom:
# Use Intercom API to export
curl https://api.intercom.io/conversations \
  -H "Authorization: Bearer YOUR_ACCESS_TOKEN" \
  -H "Accept: application/json" > conversations.json
Import to Chatwoot:
- Use Chatwoot API to create contacts and conversations
- Script example:
// import-from-intercom.js
const axios = require('axios');
const fs = require('fs');

const CHATWOOT_URL = 'https://support.yourcompany.com';
const CHATWOOT_API_KEY = 'YOUR_CHATWOOT_API_KEY';
const ACCOUNT_ID = 1;

const conversations = JSON.parse(fs.readFileSync('conversations.json'));

async function importConversations() {
  for (const conv of conversations) {
    // Create contact
    const contact = await axios.post(
      `${CHATWOOT_URL}/api/v1/accounts/${ACCOUNT_ID}/contacts`,
      {
        name: conv.user.name,
        email: conv.user.email,
      },
      {
        headers: { 'api_access_token': CHATWOOT_API_KEY }
      }
    );

    // Create conversation
    await axios.post(
      `${CHATWOOT_URL}/api/v1/accounts/${ACCOUNT_ID}/conversations`,
      {
        contact_id: contact.data.id,
        inbox_id: YOUR_INBOX_ID,
        status: 'resolved',
        // Import messages...
      },
      {
        headers: { 'api_access_token': CHATWOOT_API_KEY }
      }
    );
  }
}

importConversations();
Gradual migration strategy:
- Week 1: Deploy Chatwoot, configure, add one test inbox
- Week 2: Train team on Chatwoot, run parallel with existing tool
- Week 3: Move 25% of inboxes to Chatwoot
- Week 4: Full migration, cancel old subscription
Cost Savings Calculator
Example: SaaS Company with 10 Support Agents
| Expense | Intercom | Chatwoot (Elestio) | Annual Savings |
|---|---|---|---|
| Base Plan | $799/mo | $0 | $9,588 |
| Per-seat (10 agents) | $1,500/mo | $0 | $18,000 |
| Infrastructure | - | $50/mo | -$600 |
| Total Annual | $27,588 | $600 | $26,988 |
ROI Timeline:
- Setup time: 2-4 hours
- Training time: 4-8 hours
- Payback period: Immediate (first month saves $2,250)
Next Steps
Now that you have Chatwoot running, consider enhancing it:
Advanced Integrations:
- Connect to CRM (Salesforce, HubSpot) via API
- Set up N8N workflows for complex automation
- Integrate with billing system for customer context
- Connect to analytics (Mixpanel, Segment)
Custom Development:
- Build custom dashboard using Chatwoot API
- Create mobile app for agents (using React Native)
- Develop custom reports and analytics
- White-label the interface for your brand
Team Training:
- Schedule onboarding sessions for all agents
- Create internal documentation for common scenarios
- Set up escalation procedures
- Define SLAs and response time goals
Conclusion
You've just deployed a production-ready customer support platform that rivals Intercom and Zendesk—at a fraction of the cost. Your team can now handle unlimited conversations, across unlimited channels, with complete data ownership and zero per-seat fees.
This isn't just about saving money (though $27K/year is significant). It's about taking control of your customer relationships, owning your data, and building a support experience that scales with your business without scaling your costs.
Ready to deploy Chatwoot for your team? Get started with Elestio's managed Chatwoot hosting – fully configured, automatically maintained, and ready in minutes.
Thanks for reading ❤️ See you in the next one! 👋
Domain Setup
To configure your custom domain (e.g., support.yourcompany.com) for your Chatwoot instance:
Follow the official Elestio guide: Custom Domain and Automated Encryption (SSL/TLS)
This guide covers:
- DNS configuration (A/CNAME records)
- Automatic SSL certificate generation with Let's Encrypt
- Domain verification
- HTTPS enforcement
✅ Complete this step after deploying your Chatwoot instance to ensure secure access to your support platform.