N8N: Automate Lead Capture and CRM Sync in Real-Time

N8N: Automate Lead Capture and CRM Sync in Real-Time

The Problem: Lost Leads Cost You Revenue
Picture this: It's 2 AM, and a hot lead just filled out your website form. By the time your sales team checks their emails at 9 AM, that prospect has already moved on to a competitor who responded instantly. You've lost countless deals because manual lead processing means slow response times, missed notifications, and data entry errors that send leads into a black hole. Every minute of delay decreases your conversion rate—and your revenue.
This workflow solves that problem by creating an instant, automated pipeline from web form to CRM, with real-time Slack alerts and email notifications that get your sales team moving the moment a lead arrives.
What You'll Build
An end-to-end lead capture automation that:
- Captures form submissions via webhook
- Validates and enriches lead data
- Syncs to your CRM (HubSpot, Salesforce, Pipedrive, etc.)
- Sends instant Slack notifications to your sales team
- Triggers personalized email responses to leads
- All in real-time, with zero manual intervention
Time to implement: 15-20 minutes Technical level: Beginner to Intermediate
Prerequisites
Before you begin, ensure you have:
- N8N instance running (Deploy on Elestio)
- CRM account with API access (HubSpot, Salesforce, Pipedrive, or similar)
- CRM API key or OAuth credentials
- Slack workspace with webhook URL (optional but recommended)
- Email service credentials (SMTP or SendGrid)
- A web form or landing page to capture leads
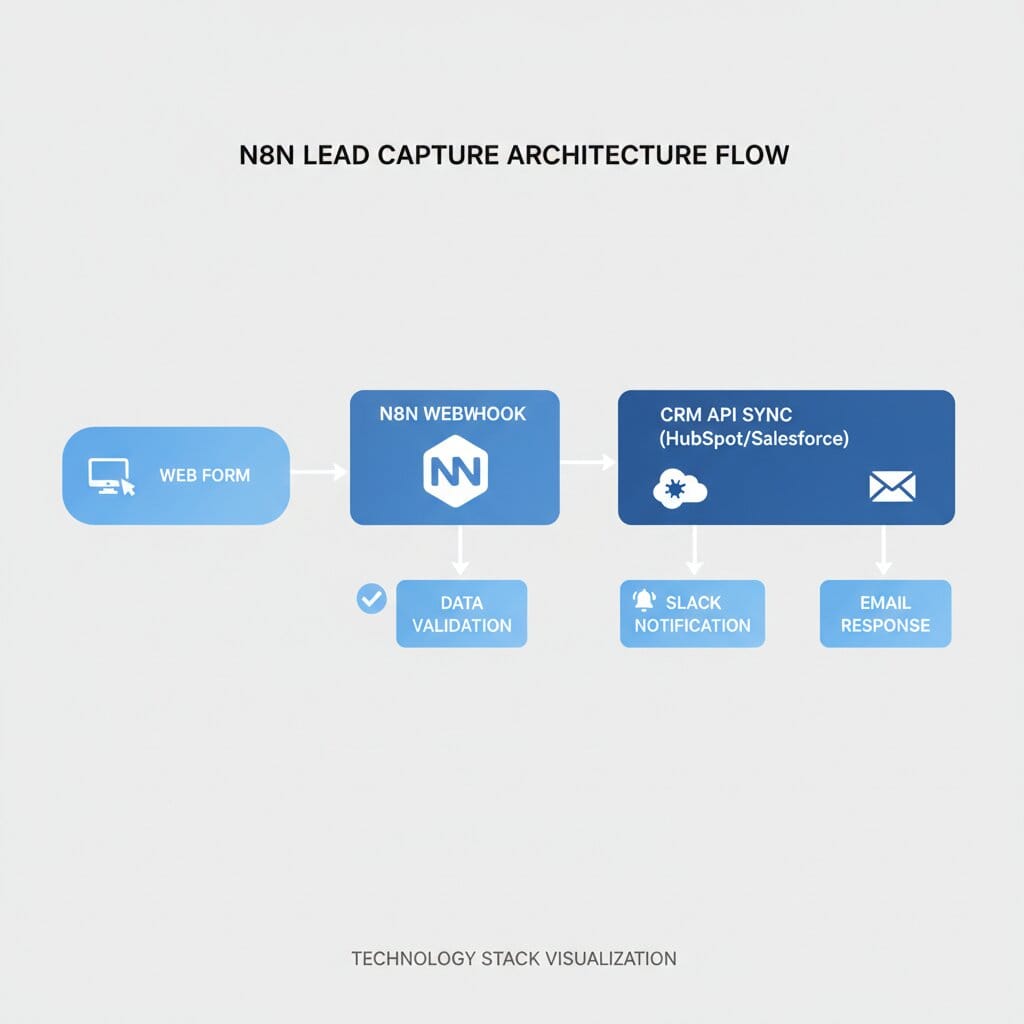
Architecture Overview
Here's how the workflow operates:
Web Form → N8N Webhook → Data Validation → CRM API → Slack Notification → Email Response
Flow breakdown:
- User submits form on your website
- Form posts data to N8N webhook endpoint
- N8N validates and enriches the data
- Lead is created/updated in your CRM
- Slack message alerts your sales team
- Automated email confirms receipt to the lead
Step-by-Step Implementation
Step 1: Create the Webhook Trigger
In your N8N workflow:
- Click "Add node" → Search for "Webhook"
- Select "Webhook" trigger node
- Configure the webhook:
- HTTP Method: POST
- Path:
lead-capture(or your preferred path) - Authentication: None (or set up Basic Auth if needed)
- Click "Execute Node" to get your webhook URL
Your webhook URL will look like:
https://your-n8n-instance.com/webhook/lead-capture
📸 Screenshot: Webhook node configuration showing POST method and path setup
Step 2: Connect to Your CRM
Now let's sync the lead to your CRM. I'll show HubSpot as an example, but the pattern works for any CRM.
For HubSpot:
- Click "+" → Search for "HubSpot"
- Select "HubSpot" node
- Configure:
- Credentials: Click "Create New" and add your HubSpot API key
- Resource: Contact
- Operation: Create or Update
- Map the fields:
Email → {{ $json.email }}
First Name → {{ $json.firstName }}
Last Name → {{ $json.lastName }}
Company → {{ $json.company }}
Phone → {{ $json.phone }}
Lead Source → {{ $json.source }}
For other CRMs (Salesforce, Pipedrive, etc.):
Use the HTTP Request node with their API:
{
  "method": "POST",
  "url": "https://api.your-crm.com/v1/leads",
  "authentication": "headerAuth",
  "headers": {
    "Authorization": "Bearer YOUR_CRM_API_KEY",
    "Content-Type": "application/json"
  },
  "body": {
    "email": "{{ $json.email }}",
    "first_name": "{{ $json.firstName }}",
    "last_name": "{{ $json.lastName }}",
    "company": "{{ $json.company }}",
    "phone": "{{ $json.phone }}",
    "source": "{{ $json.source }}"
  }
}
Replace YOUR_CRM_API_KEY with your actual API key.
📸 Screenshot: HubSpot node configuration with field mappings
Step 3: Send Slack Notification
Alert your sales team instantly:
- Click "+" → Search for "Slack"
- Select "Slack" node
- Configure:
- Credentials: Add your Slack webhook URL (Get one here)
- Resource: Message
- Operation: Post
- Channel: #sales (or your preferred channel)
- Message template:
🎯 **New Lead Captured!**

**Name:** {{ $('Code').item.json.fullName }}
**Email:** {{ $('Code').item.json.email }}
**Company:** {{ $('Code').item.json.company }}
**Phone:** {{ $('Code').item.json.phone }}
**Source:** {{ $('Code').item.json.source }}
**Interest:** {{ $('Code').item.json.interest }}

**Message:**
{{ $('Code').item.json.message }}

**Captured:** {{ $('Code').item.json.capturedAt }}

✅ Lead synced to CRM successfully!
📸 Screenshot: Slack node with formatted message template
Step 4: Send Confirmation Email to Lead
Acknowledge the lead's submission immediately:
- Click "+" → Search for "Send Email"
- Select "Send Email" node
- Configure SMTP credentials (or use SendGrid/Mailgun node)
- Email template:
From: your-sales@yourcompany.com To: {{ $('Code').item.json.email }} Subject: Thanks for reaching out, {{ $('Code').item.json.firstName }}!
Body (HTML):
<!DOCTYPE html>
<html>
<head>
  <style>
    body { font-family: Arial, sans-serif; line-height: 1.6; color: #333; }
    .container { max-width: 600px; margin: 0 auto; padding: 20px; }
    .header { background: #0066cc; color: white; padding: 20px; text-align: center; }
    .content { padding: 20px; background: #f9f9f9; }
    .button { display: inline-block; padding: 12px 24px; background: #0066cc; color: white; text-decoration: none; border-radius: 4px; margin-top: 20px; }
  </style>
</head>
<body>
  <div class="container">
    <div class="header">
      <h1>Thanks for Reaching Out!</h1>
    </div>
    <div class="content">
      <p>Hi {{ $('Code').item.json.firstName }},</p>

      <p>We received your inquiry and our team is reviewing it right now. We typically respond within 1 business hour during working hours (9 AM - 6 PM EST).</p>

      <p><strong>What you submitted:</strong></p>
      <ul>
        <li>Name: {{ $('Code').item.json.fullName }}</li>
        <li>Email: {{ $('Code').item.json.email }}</li>
        <li>Company: {{ $('Code').item.json.company }}</li>
      </ul>

      <p>In the meantime, feel free to check out our resources:</p>

      <a href="https://yourcompany.com/resources" class="button">View Resources</a>

      <p>Looking forward to connecting!</p>

      <p>Best regards,<br>
      Your Sales Team</p>
    </div>
  </div>
</body>
</html>
📸 Screenshot: Email node configuration with HTML template
Step 5: Add Error Handling
Wrap your workflow in error handling:
- Select all nodes (Ctrl+A or Cmd+A)
- Right-click → "Add Error Workflow"
- Add a Slack or Email node to the error workflow
- Configure error notification:
⚠️ **Lead Capture Workflow Failed**

**Error:** {{ $json.error.message }}
**Node:** {{ $json.error.node }}
**Timestamp:** {{ new Date().toISOString() }}

Please check the N8N workflow immediately.
📸 Screenshot: Error handling workflow setup
Testing Your Workflow
Test with Sample Data
- Click "Execute Workflow" at the top
- Use a tool like Postman or curl to send test data:
curl -X POST https://your-n8n-instance.com/webhook/lead-capture \
  -H "Content-Type: application/json" \
  -d '{
    "name": "John Smith",
    "email": "john.smith@example.com",
    "company": "Acme Corp",
    "phone": "+1-555-0123",
    "interest": "Product Demo",
    "message": "I would like to schedule a demo for next week."
  }'
Expected results:
- ✅ Webhook receives the data
- ✅ Validation passes
- ✅ Lead appears in your CRM
- ✅ Slack notification arrives in #sales channel
- ✅ Confirmation email sent to john.smith@example.com
Connect Your Web Form
Add this JavaScript to your website form:
document.getElementById('lead-form').addEventListener('submit', async (e) => {
  e.preventDefault();

  const formData = {
    name: document.getElementById('name').value,
    email: document.getElementById('email').value,
    company: document.getElementById('company').value,
    phone: document.getElementById('phone').value,
    interest: document.getElementById('interest').value,
    message: document.getElementById('message').value
  };

  try {
    const response = await fetch('https://your-n8n-instance.com/webhook/lead-capture', {
      method: 'POST',
      headers: { 'Content-Type': 'application/json' },
      body: JSON.stringify(formData)
    });

    if (response.ok) {
      alert('Thank you! We\'ll be in touch shortly.');
      document.getElementById('lead-form').reset();
    } else {
      alert('Something went wrong. Please try again.');
    }
  } catch (error) {
    console.error('Error:', error);
    alert('Unable to submit form. Please email us directly.');
  }
});
Replace the webhook URL with your actual N8N webhook endpoint.
Troubleshooting
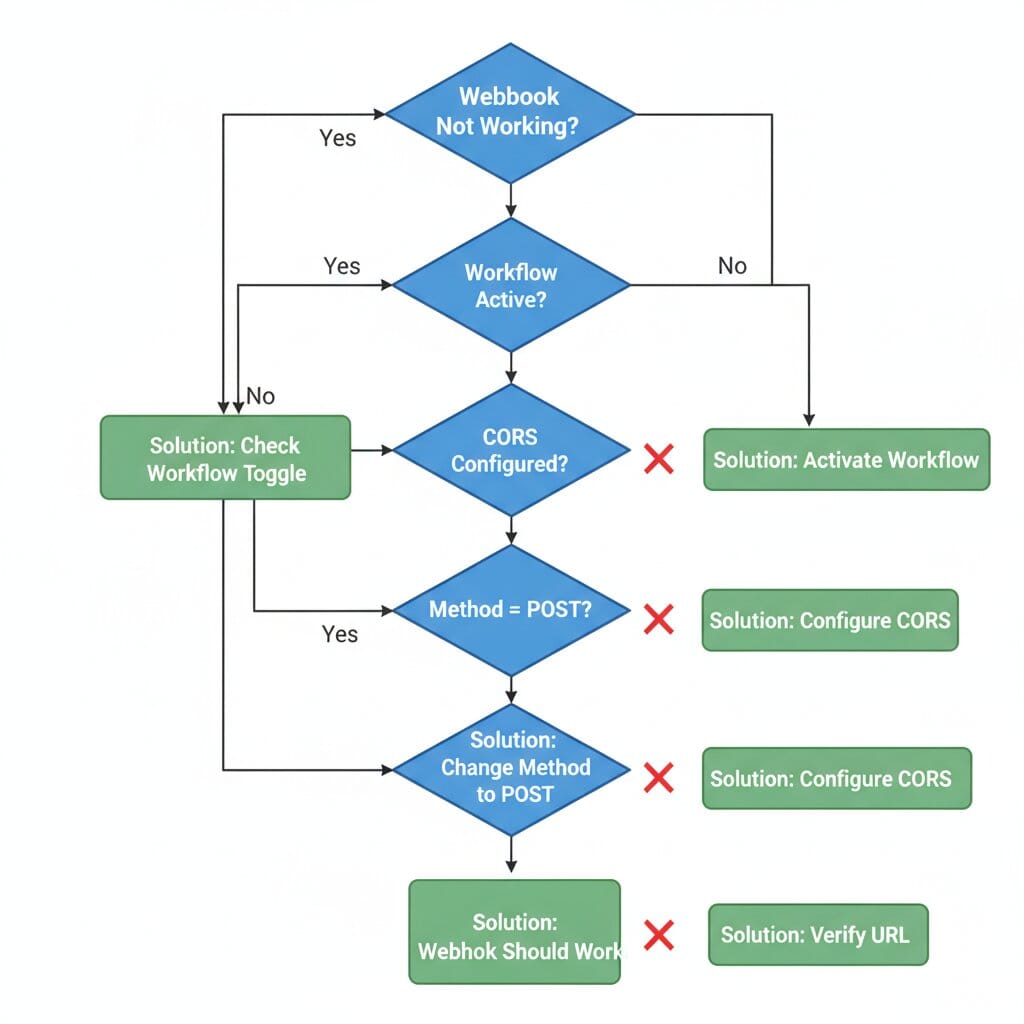
Issue: Webhook Not Receiving Data
Symptoms: Form submits but nothing happens in N8N
Solutions:
- ✅ Verify webhook is set to POST method
- ✅ Check webhook URL is correct (copy from N8N)
- ✅ Ensure workflow is active (toggle at top right)
- ✅ Check browser console for CORS errors
- ✅ Test with curl first to isolate form issues
Issue: CRM Sync Fails
Symptoms: Lead captured but not in CRM
Solutions:
- ✅ Verify API credentials are correct
- ✅ Check CRM API rate limits
- ✅ Ensure required CRM fields are mapped
- ✅ Look at N8N execution logs for error details
- ✅ Test CRM credentials with a simple API call first
Issue: Duplicate Leads Created
Symptoms: Same person creates multiple CRM entries
Solutions:
- ✅ Use "Create or Update" operation instead of "Create"
- ✅ Set email as the unique identifier in CRM settings
- ✅ Add deduplication logic in Code node
- ✅ Enable CRM's built-in duplicate detection
Issue: Emails Not Sending
Symptoms: Workflow completes but no confirmation email
Solutions:
- ✅ Verify SMTP credentials are correct
- ✅ Check spam folder
- ✅ Ensure "From" email is authorized in your email service
- ✅ Test SMTP connection with a simple test email
- ✅ Check email service logs for bounce/block messages
Issue: Slack Notifications Not Appearing
Symptoms: No Slack message despite successful execution
Solutions:
- ✅ Regenerate Slack webhook URL
- ✅ Verify bot is invited to the target channel
- ✅ Check Slack workspace permissions
- ✅ Test webhook URL with curl independently
Production Optimization Tips
Performance:
- Enable workflow execution queue for high-volume forms
- Set appropriate timeout values (30-60 seconds)
- Use async operations where possible
Security:
- Add webhook authentication (Basic Auth or API key)
- Validate and sanitize all input data
- Store CRM credentials in N8N's credential manager
- Enable HTTPS for webhook endpoint
Monitoring:
- Set up error notifications to your team
- Monitor execution times and success rates
- Track lead conversion metrics
- Regular audit of failed executions
Scalability:
- Consider rate limiting for webhook endpoint
- Archive old execution logs regularly
- Use N8N's built-in retry mechanism for failed operations
Next Steps
Now that you have automated lead capture working, consider enhancing it:
- Lead Scoring: Add AI-powered lead qualification using OpenAI
- Multi-Form Support: Create separate workflows for different landing pages
- Follow-Up Sequences: Trigger automated email sequences based on lead interest
- Calendar Booking: Include Calendly link for instant meeting scheduling
- Enrichment: Use Clearbit or similar services to enrich lead data
Conclusion
You've just built a professional lead capture system that responds in seconds instead of hours. Your sales team now gets instant notifications, leads are automatically organized in your CRM, and prospects receive immediate confirmation—all without a single manual step.
This automation doesn't just save time; it directly impacts your bottom line by ensuring no lead falls through the cracks and every prospect gets an instant response.
Want to deploy N8N for your business? Get started with Elestio's managed N8N hosting – fully configured and ready in minutes.
Thanks for reading ❤️ See you in the next one! 👋